If you’re like most people, your refrigerator is undoubtedly in desperate need of cleaning. If you’re not cautious, the back of the fridge may become a sanctuary for expired condiments, week-old leftovers, and moldy vegetables. As a result, fridge organization is critical!
You don’t want to waste time looking for the correct ingredient while you’re hungry. You want to be able to reach inside the refrigerator and quickly locate the item you’re looking for. Having a “home” for each type of food item can aid in keeping things in order.
Deep clean your refrigerator at least four times a year. While every refrigerator is different, there are a few tricks you can apply to keep things organized. Follow this step–by–step guide and your refrigerator will be sparkling in no time!
Before You Organize Your Refrigerator, Here’s What You Should Do
You’ll want to clean and sanitize every surface on the interior of your fridge before you go full-on organization mode. This is beneficial in more ways than one, as a cleansed fridge reduces the risk of foodborne illnesses and contamination. Follow these simple procedures to disinfect your refrigerator:
Completely empty the refrigerator. Remove everything from the fridge so that dirt, stains, and solidified spills may be readily removed. Work in pieces to avoid your food going bad. Another alternative is to fill a cooler with ice and temporarily store your perishable foods there.
Using a damp cloth, wipe off all surfaces. Sanitize all surfaces of your fridge with a cleaning wipe or paper towels and disinfecting spray. This encompasses all shelf levels and within the door sections. Remove the drawers and soak them in hot, soapy water before cleaning them down and reinstalling them.
Put the fridge back together and apply a deodorizer. Keeping a deodorizer in your refrigerator might help keep bad odors from persisting. Baking soda is a fantastic deodorizer. You can purchase specific fridge packs that adhere to the wall, or simply position an open container at the back of the device.
How to Keep Your Refrigerator Organized
You may start formulating a game plan now that your refrigerator is clean and sanitized. It’s easier to move through the fridge by mentally dividing it into pieces and going through each one one at a time.
Different types of goods should be placed in different places, such as top shelves, lower shelves, doors, and drawers, therefore it’s crucial to plan beforehand. You can either organize each section individually or select the section of the fridge that most interests you.
Suggested Read: 13 Items You Need to Dispose before 2022
Upper Shelf Hacks
You should avoid storing raw meat or vegetables on your upper shelves because they are the highest position in your fridge. Leftovers, drinks, and ready-to-eat goods like yogurt, cheese, and deli meats are ideal for storing on the top shelves.
Because these goods have a shorter shelf life than condiments, oils, and butters, it’s a good idea to label and arrange them.
1. Make a “Eat Me First” box for foods that are about to expire
Do you recall the cartons you purchased? Place everything nearing its expiration date inside one of those marked “Eat Me First.” It’s advisable to err on the side of caution if you’re not sure if anything has gone bad. Label all leftovers with the date they were prepared if possible and use this chart from Foodsafety.gov to determine how long they will last.
2. Use a Lazy Susan to Find Food Quickly
Food products can become lost in the back of your fridge until they’re well past their expiration date. With a lazy Susan, you can keep all your food supplies within easy reach. Lazy Susans are traditionally used in the spice cabinet, but they can also be utilized in the refrigerator. Keep open jars, munchies, and condiments on top, then rotate the disk as needed to get to what you need.
Suggested Read: Top Places to Get Charcuterie Boards Delivered to Your Home
3. Make Use of Wall Space by Hanging Baskets
Baskets with suction cups that cling to the side of your fridge are available. They’re great for storing little items that may otherwise get lost in the fridge. String cheese, little cups of hummus, or pre-made lunch meat and cheese rollups, for example! Simply tape the basket to the inside of the refrigerator’s wall.
Hacks for the Lower Shelf
You can go on to the lower shelves once the top shelf is in fine working order. It’s safe to store raw ingredients here because they’re underneath the ready-to-eat items. Packaged, raw meats that will be used in a future recipe should be carefully stored on the lowest shelf.
If you have any additional ready-to-eat ingredients that won’t fit on the top shelf, place them above the meats on the lower shelves. While preserving meat is self-explanatory, here are some tips for storing the rest of your lower-shelf goods.
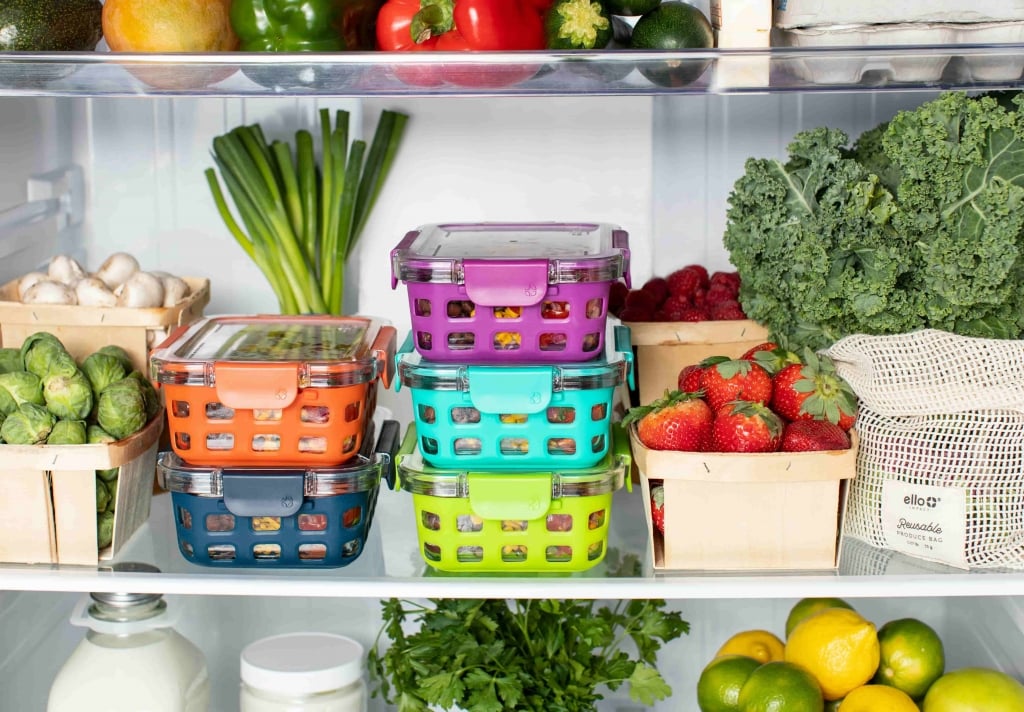
4. Put like items together
To make sure that like things are immediately available and ready to grab, put them together in clear baskets. Leftovers, sandwich fixings, smoothie components, and sauces could all be found in baskets.
5. Keep Snacks in File Organizers
The majority of documentation is now completed digitally, making file boxes obsolete. These boxes, on the other hand, make the ideal form for storing a variety of snacks. Everything from little containers of chopped vegetables to yogurts, applesauce pouches, and pouch drinks can be stored. To make things even easier to find, label them.
6. Hang Bagged Items with Curtain Ring Clips
Wire shelves or bars are common on the edges of refrigerator shelves. You can hang packaged things like shredded cheese or lettuce from the edge of your shelves to free up room below! You’ll need ringed curtain clips, such as these. After that, simply attach the curtain ring clips and hang your rolled bags as desired.
Suggested Read: 8 Easy Ways to Prep Your Kitchen for Holiday Cooking
Hacks for a Crisper Drawer
Crispers, also known as the drawers at the bottom of most refrigerators, are frequently humidified and temperature-controlled to keep specific items fresher for longer. It’s an art to correctly store your food in the crisper, as some foods require more humidity and others require less. These humidity controls are ideal for fruits and vegetables; just remember to label everything!
7. Organize your drawers using dividers
You may use the same dividers that you’d use in your garment drawers in your crisper drawers! Simply purchase the adjustable type and arrange to your preference. Greens like lettuce and spinach should be grouped together, onions, garlic, and ginger should be grouped together, and carrots and snap peas should be grouped together!
8. Use paper towels to line the bottom of the container
Crisper drawers can be one of the most difficult parts of your fridge to clean. Place a layer of paper towels at the bottom of the drawers before filling them with fruits and vegetables to keep them cleaner for longer. Little bits of broccoli or onion peels that fall off over time will be collected by the paper towels. To make cleaning easier, replace them every two weeks.
9. Acquire a Basic Understanding of Humidity Controls
Knowing how to use your crisper’s humidity settings appropriately, as we discussed previously, will help your fruits and vegetables live longer. Most refrigerators allow you to adjust the humidity level from high to low, so set one drawer to high humidity and the other to low.
Anything that can decay should be stored in the low humidity drawer. This includes ethylene-emitting fruits and vegetables such as apples, pears, avocados, and most fruits. Ethylene gas is produced by certain fruits (and some vegetables), and it accelerates the ripening and expiration of many meals. Leafy greens like spinach, arugula, and herbs should go in the high humidity drawer. The wetness will keep the vegetables crisper and fresher for longer.
Hacks for Doors

Only condiments should be kept in the refrigerator door because it is the warmest portion of the fridge. While many people do it, putting eggs or milk in the door is not a good idea because they should be kept in a cooler portion of the refrigerator.
Condiments, sauces, butter, and other non-perishable foods are ideal candidates for door storage, but that doesn’t mean it has to be disorganized. With these methods, you can keep your refrigerator doors spotless.
10. Label and designate each door section
Keep like goods together in each door divider and identify the exterior of the divider with a sticker or magnet to keep things super tidy. Sauces (hot sauce, soy sauce, etc. ), sandwich dressings (mayonnaise, mustard, relish, ketchup), and speciality goods are all examples of similar items (olives, pesto, tapenade).
11. Store condiments in an egg carton
If you’re putting condiments in bottles, put an egg carton at the bottom of the area. Bottled mustard, mayo, ketchup, and dressing can be stored in egg cartons upside down, nose first. Because all of the liquid will be sitting around the bottle’s opening, this will keep them orderly and reduce waste. Never again will you have to shake or tap your condiments out of their containers!
12. Place kids’ drinks on one of the lower door shelves
On the lowest shelf, create a kid-accessible “refuel zone.” Fill it with kid-friendly beverages or quick-to-eat foods like yogurt. Teach your children to ask for a drink anytime they are thirsty, and keep a supply on hand for them.
You’ll be surprised how much faster and easier cooking may be if you clean your fridge on a regular basis. Easy tasks like collecting ranch dressing or some baby carrots for a snack can be made easier with these simple processes. If you have children, you’ll get bonus points because they’ll enjoy the food stations! Now all you have to do is sit back, relax, and take in the “fruits” of your effort.
Suggested Read: Minimalist Upgrades for Your Home Spaces